출처 : http://blog.naver.com/PostList.nhn?from=postList&blogId=moral369&categoryNo=25¤tPage=2
WebOS 엡 개발 프레임워크 종류
Mojo :
JavaScript, HTML, CSS로 만들어진 팜의 WebOS폰 용 어플리케이션 개발 프레임워크
Ares :
Mojo어플 개발을위한 웹기반의 통합개발환경(IDE)
Enyo 1 :
큰 화면을 가진 WebOS 장치들을위해 어플리케이션 개발 프레임워크로서 Mojo를 대체
Enyo 2 :
크로스플랫폼(WebOS, iOS, 안드로이드, 데스크탑), 크로스브라우저(IE8+, theWebKits, 모질라 등) 을 위해 디자인된 어플리케이션 개발프레임워크
Enyo 2
(지원 플랫폼 참고, Cross-platform Support : http://enyojs.com/docs/platforms)
Enyo1 까지는 HP 태블릿 단말기 등의 디바이스 지원을 위한어플리케이션 개발 프레임워크였으나 현재 2.0은 크로스-플랫폼 지원을 위한 WebOS를 지향하므로Enyo2를 사용하기 위해 에뮬레이터를 굳이 설치할필요는 없음(현재 실습에 Webkit기반의 브라우저와 jsFiddle 사용 중)
JSFiddle에서 컴파일
- jsFiddle.net에서 작업(HTML,JS, CSS, Ajax 등 가능)
- 작업내용을 올리고 다른사람 들과 공유할 수 있다.
* jsFiddle이란 : 웹 상에서 바로 작업 후 컴파일 하여결과화면을 볼 수 있고 같은 사용자간 정보 공유 서비스를 제공
WebKit기반의 브라우저로 컴파일
코드의차이(Enyo와 HTML5(Control))
Enyo와 HTML5
-Enyo의 기본(Fundamental) 객체에는 Kind, Control,Component 3가지가 있음
Control은 HTML에서의 각 태그를 Dom tree 구조에서 노드를 제어 하듯이 각각의control이 노드로 직접 변환이 가능
예제1)
HTML에서의
<body>
<div id = “control”> Hello world </div>
</body>
를 Enyo 문법으로 표현하면
Enyo.create({ //enyo.create 팩토리 메소드에서 create 생성자 호출
Content: “Hello world” //컨텐트 정의
}).renderInto(document.body); //body영역에 content 내용
코드와 동일. Dom 노드와 같은역할
예제2)
<span id="control" class="a-css-class"style="color: purple;">Hello World</span>
위 코드를 enyo로 표현하면
enyo.create({
nodeTag: "span", className: "a-css-class", style: "color: purple;", content: "HelloWorld"
}).renderInto(document.body);
예제 1,2모두 enyo에서의 control 객체 생성 과정을 보여줌. Control 객체는 HTML에서 Dom node와 비슷한 역할을 수행하는 만큼 Dom node와 같이 CSS클래스와 스타일을 첨부할 수 있다.
예제1 예제2의 차이점 중 눈여겨 볼 부분이 HTML5에서는 CSS클래스를 식별하기 위해 class용어를 사용하나 자바스크립트에서는 예약어로잡혀있으므로 ClassName을 사용한다.
또한Dom node와 같이 끼어넣기(nest)도 가능하다.
Enyo.create({
Components: [
{content:”샬라샬라”}, components: [ {content:” 샬라샬라2”}
]
]
예제3)
enyo.kind({ //kind는 enyo.kind 팩토리 메소드에서 생성된 생성자
name: "Circle",
kind: "Control", //Control에서 상속,kind는 C++나 자바에서의 클래스와 유사한 개념
published: {
color: "magenta",
bgColor: "black"
},
content: “Hi", style: "padding: 2px 6px; border: 3px solid;border-radius: 20px; cursor: pointer;",
create: function() {
this.inherited(arguments);
this.colorChanged();
},
colorChanged: function() {
this.applyStyle("border-color",this.color);
},
bgColorChanged: function() {
this.applyStyle("background-color",this.bgColor);
},
mousedown: function() {
this.applyStyle("background-color","white");
},
toString: function() {
return this.x + ", " + this.y;
}
});
enyo.kind({
name: "Point3D",
kind:"Point", // 객체 상속
z: 0,
constructor: function(x, y, z) {
this.inherited(arguments); //매개변수 상속
this.z = z;
},
translate: function(dx, dy, dz) {
this.inherited(arguments);
this.z += dz;
},
toString: function() {
return this.inherited(arguments) + "," + this.z;
}
});
p = new Point3D(1, 1, 1);
// 두번째 enyo.kind에서 name을 지정하고 kind가 old kind를 상속 받아 확장 기능을 구현.
// 결국 kind를 통해 old kind를 상속받아 클래스와 같이 사용 한 것을 볼수
Components
Component란 엔요의 기본 빌드 블록(Basic BuildingBlock). 이 컴포넌트를 통해 표준방법으로 작성되어공통된 작업이 가능하도록 기능을 공유할 수 있음. 컴포넌트마다하나의 name값(String)을 가지며 하나의 컴포넌트 안에 여러 개의컴포넌트를 생성할 수도 있음. 컴포넌트는 자신이 가진 컴포넌트들에 대한 라이프사이클을 스스로 관리 함.
예제)
enyo.create({
components: [
// custom graphics 버튼
{kind:"Button"},
// hinting과 graphic fx와 같은 스페셜 특징이 사용되는 input box
{kind: "FancyInput"},
// custom graphics로 된 셀렉터
{kind: "RadioGroup", components: [ // 컴포넌트 내 다른 컴포넌트 삽입(상위 컴포넌트가 이 컴퓨넌트의 라이프사이클에 대한 책임을 짐
{label:"Alpha"},
{label:"Beta"},
{label:"Gamma"}
]}
]}).renderInto(document.body); //HTML body 부분에 렌더링
예제 실습
assets: 사진, 동영상 등 각종 자원소스가 들어감.
Enyo : 엔요프레임워크 코어 등이 들어감.
Lib : g11n, 레이아웃, onyx(enyo의 UI담당), 사용자 라이브러리
등이 들어감.
source : 기본적으로 App.css와 App.js 파일이 들어가 있으며
이 파일을 이용하여 프로젝트를 시작
Debug.html : index.html 실행 후 정의되지 않았을 경우
호출되어 디버깅 용으로 사용됨.
Index.html : 가장 먼저 로드되는 HTML문서.
- 회원가입(설명생략)
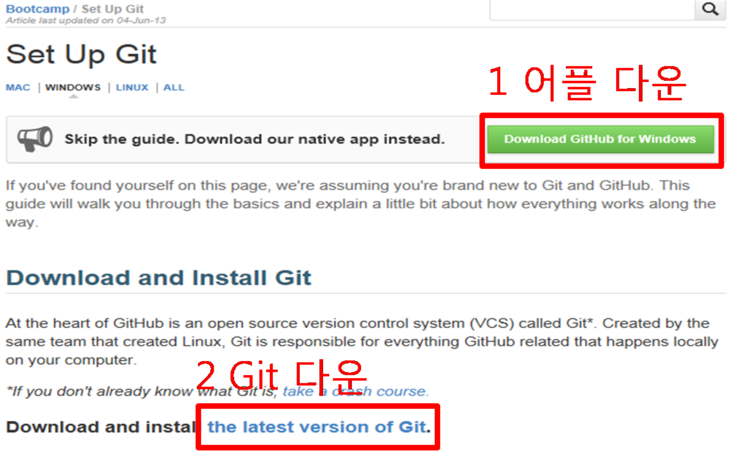
- https://help.github.com/articles/set-up-git 접속하여 Git(필수) 설치와
github 어플리케이션(선택)을 설치

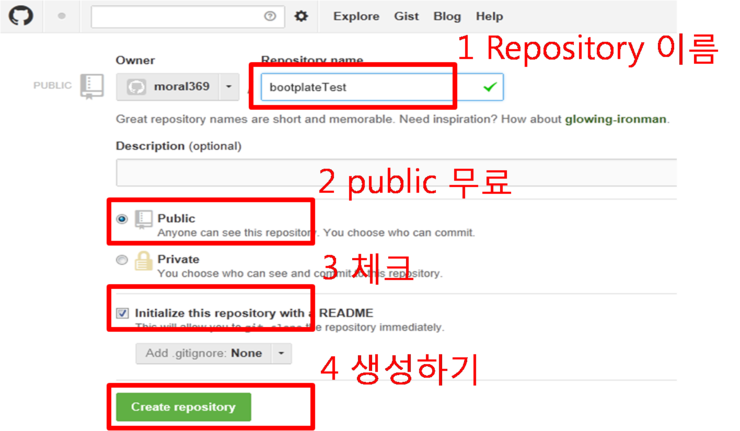
2. Repository 생성

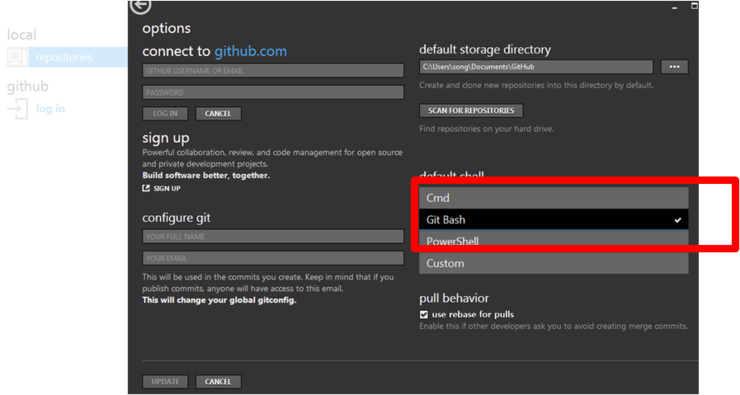
3. Git bash 실행


Git Bash로 변경(큰 차이 없음)
3. Git bash 실행
$ cd /workspace/
$ git clone https://github.com/enyojs/bootplate.git bootplateTest
$ cd bootplateTest
$ git clone https://github.com/enyojs/enyo.git
$ git clone https://github.com/enyojs/onyx.git
$ git clonehttps://github.com/enyojs/layout.git
$ git submodule update –init
결국 이클립스 프로젝트 익스플로러 상 폴더 구조는 아래 그림과
같다.
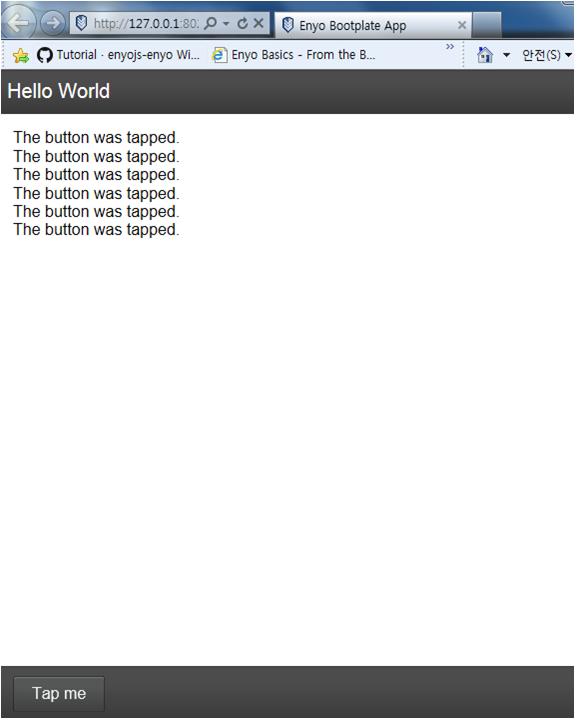
지금까지 제대로 설치와 설정이 되었다면 Debug.html을 Runas -> JavaScript WEB Application 으로 실행시키면 아래와 같이 헬로우 월드가출력된다. Tap Me 버튼을 클릭하면 The button was tapped메시지가 출력된다.

- source/App.js 를 더블클릭하면 아래와 같은 기본값으로 짜여있다.
enyo.kind({
name: "App",
kind: "FittableRows",
fit: true,
components:[
{kind: "onyx.Toolbar", content: "Hello World"},
{kind: "enyo.Scroller", fit: true, components: [
{name: "main", classes:"nice-padding", allowHtml: true}
]},
{kind: "onyx.Toolbar", components: [
{kind: "onyx.Button", content: "Tap me", ontap: "helloWorldTap"}
]}
],
helloWorldTap: function(inSender, inEvent) {
this.$.main.addContent("The button was tapped.<br/>");
}
});
만들었던 remote repository에 commit 및 push하여 최종 저장한다.
'Stupid Computer > 6. WebOs' 카테고리의 다른 글
| [Enyo] 윈도우에 webos, enyo 개발환경 구축하기 ( webos install guide, enyo development guide) (0) | 2014.05.09 |
|---|---|
| [Enyo] debug.html file ~ 엔요 debug.html 파일 소스 ~~ (0) | 2014.04.30 |
| [WebOS] Enyo Example ! (0) | 2014.04.22 |
| [enyo] enyo.scroller 사용법 ! (0) | 2014.04.10 |
| [webOs] Enyo Core 번역 (0) | 2014.03.24 |
| [webOS] 이클립스 설치 및 webOS플러그인 설치 (0) | 2014.03.19 |
| [webOS] 개발환경 구축하기 ~ webos 개발환경 세팅 ! (0) | 2014.03.19 |
| [webOs] HP, webOS의 새로운 프레임워크 Enyo 발표 (0) | 2014.03.18 |
| [webOS] adb push, adb pull 사용법 및 read only 오류 해결 방법 ~ (0) | 2014.03.07 |
| 아이폰잡는 WebOs ? (2011년 글 ) (0) | 2014.02.25 |